vLLM 大模型本地推理库
vLLM 是一个开源项目,允许你进行 LLM 推理和服务。本文介绍如何配置和运行 vLLM 以在生产中提供开源大模型的推理服务。
关于LangChat
LangChat 是Java生态下企业级AIGC项目解决方案,集成RBAC和AIGC大模型能力,帮助企业快速定制AI知识库、企业AI机器人。
支持的AI大模型: Gitee AI / 阿里通义 / 百度千帆 / DeepSeek / 抖音豆包 / 智谱清言 / 零一万物 / 讯飞星火 / OpenAI / Gemini / Ollama / Azure / Claude 等大模型。
- 官网地址:http://langchat.cn/
开源地址:
vLLM 是当今最令人兴奋的 LLM 项目之一。每月下载量超过 20 万次,并拥有宽松的 Apache 2.0 许可证,vLLM 正成为一种越来越流行的大规模提供 LLM 的方式。
在本教程中,我将向你展示如何配置和运行 vLLM 以在生产中提供开源 LLM。
1、开始使用 vLLM
对于 vLLM 新手,我们首先解释一下什么是 vLLM。
vLLM 是一个开源项目,允许你进行 LLM 推理和服务。推理意味着你可以下载模型权重并将其传递给 vLLM 以通过其 Python API 执行推理;以下是其文档中的一个示例:
from vllm import LLM, SamplingParams

prompts = [
    "Hello, my name is",
    "The president of the United States is",
    "The capital of France is",
    "The future of AI is",
]

# initialize
sampling_params = SamplingParams(temperature=0.8, top_p=0.95)
llm = LLM(model="facebook/opt-125m")

# perform the inference
outputs = llm.generate(prompts, sampling_params)

# print outputs
for output in outputs:
    prompt = output.prompt
    generated_text = output.outputs[0].text
    print(f"Prompt: {prompt!r}, Generated text: {generated_text!r}")
在这方面,vLLM 与 Hugginface 的 transformers 库类似,作为比较,以下是使用 transformers 对同一模型进行推理的方法:
from transformers import pipeline

generator = pipeline('text-generation', model="facebook/opt-125m")
generator("Hello, my name is")
正如我在前面的例子中所展示的那样,使用 Python API 运行推理对于快速测试来说很好,但在生产环境中,我们希望提供一个简单的界面来与模型交互,以便系统的其他部分可以轻松调用它,一个很好的解决方案是通过 API 公开我们的模型。
假设你发现了 vLLM,现在你想构建一个 REST API 来为模型提供服务,你可以构建一个像这样的 Flask 应用程序:
from flask import Flask, request, jsonify
from vllm import LLM, SamplingParams

app = Flask(__name__)
sampling_params = SamplingParams(temperature=0.8, top_p=0.95)
llm = LLM(model="facebook/opt-125m")

@app.route('/generate', methods=['POST'])
def generate():
    data = request.get_json()
    prompts = data.get('prompts', [])

    outputs = llm.generate(prompts, sampling_params)

    # Prepare the outputs.
    results = []

    for output in outputs:
        prompt = output.prompt
        generated_text = output.outputs[0].text
        results.append({
            'prompt': prompt,
            'generated_text': generated_text
        })

    return jsonify(results)

if __name__ == '__main__':
    app.run(host='0.0.0.0', port=5000)
我们的用户现在可以通过访问 /generate 端点来使用我们的模型。但是,这有很多限制:如果许多用户同时点击端点,Flask 将尝试同时运行它们并崩溃。我们还需要实现我们的身份验证机制。最后,互操作性是有限的;用户必须阅读我们模型的 REST API 文档才能与我们的模型交互。
这就是 vLLM 的服务部分大放异彩的地方,因为它为我们提供了所有这些。如果 vLLM 的 Python API 类似于 transformers 库,那么 vLLM 的服务器类似于 TGI。
现在我们已经解释了 vLLM 的基础知识;让我们安装它吧!
2、安装 vLLM
安装 vLLM 很简单:
pip install vllm请记住,vLLM 需要 Linux 和 Python >=3.8。此外,它还需要计算能力 >=7.0 的 GPU(例如 V100、T4、RTX20xx、A100、L4、H100)。
最后,vLLM 是使用 CUDA 12.1 编译的,因此你需要确保你的机器正在运行此 CUDA 版本。要检查它,请运行:
nvcc --version如果你没有运行 CUDA 12.1,可以安装使用你正在运行的 CUDA 版本编译的 vLLM 版本(请参阅安装说明以了解更多信息),或者安装 CUDA 12.1。
3、检查你的vLLM安装
在继续之前,我建议你通过运行一些健全性检查来检查你的vLLM安装:
# ensure torch is working with CUDA, this should print: True
python -c 'import torch; print(torch.cuda.is_available())'
现在,将以下内容存储在 check-vllm.py 文件中:
from vllm import LLM, SamplingParams
prompts = [
    "Mexico is famous for ",
    "The largest country in the world is ",
]

sampling_params = SamplingParams(temperature=0.8, top_p=0.95)
llm = LLM(model="facebook/opt-125m")
responses = llm.generate(prompts, sampling_params)

for response in responses:
    print(response.outputs[0].text)
并运行脚本:
python check-vllm.py模型加载后,你将看到一些输出;就我而言,我得到了这个:
~~national~~ cultural and artistic art. They've already worked with him.

~~the country~~ a capitalist system with the highest GDP per capita in the world
4、启动 vLLM 服务器
现在我们已经安装了 vLLM,让我们启动服务器。基本命令如下:
python -m vllm.entrypoints.openai.api_server --model=MODELTORUN其中 MODELTORUN 是你想要提供的模型,例如,提供 google/gemma-2b。
python -m vllm.entrypoints.openai.api_server --model=google/gemma-2b请注意,某些模型(例如 google/gemma-2b)需要你接受其许可证,因此你需要创建一个 HuggingFace 帐户,接受该模型的许可证并生成访问令牌。
例如,在 HugginFace 上打开 google/gemma-2b(需要登录)时,你会看到以下内容:
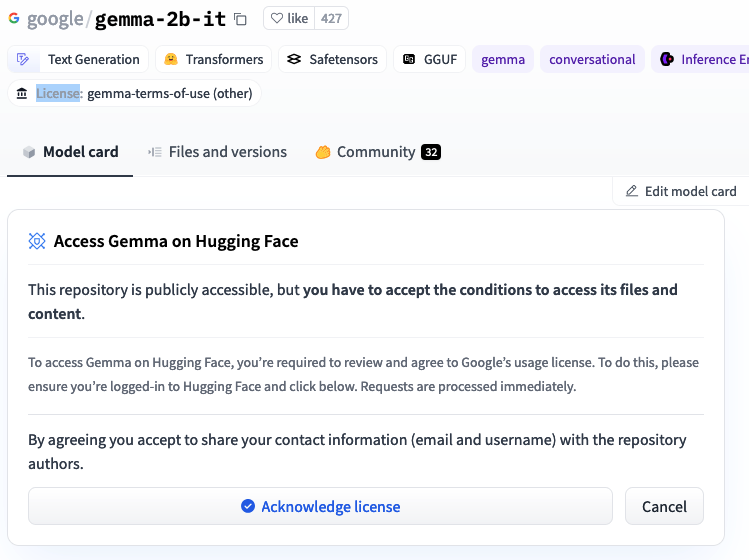
接受许可证后,转到令牌部分并获取访问令牌,然后在启动 vLLM 之前按如下方式设置令牌:
export HF_TOKEN=YOURTOKEN一旦设置了令牌,你就可以启动服务器。
python -m vllm.entrypoints.openai.api_server --model=google/gemma-2b请注意,即使下载了权重,也需要令牌。否则,你将收到以下错误:
  File "/opt/conda/lib/python3.10/site-packages/huggingface_hub/hf_file_system.py", line 863, in _raise_file_not_found
    raise FileNotFoundError(msg) from err
FileNotFoundError: google/gemma-2b (repository not found)
5、设置 dtype
需要考虑的一个重要设置是 dtype,它控制模型权重的数据类型。你可能需要根据你的 GPU 调整此参数,例如尝试运行 google/gemma-2b:
# --dtype=auto is the default value
python -m vllm.entrypoints.openai.api_server --model=google/gemma-2b --dtype=auto
在 NVIDIA Tesla T4 上出现以下错误:
ValueError: Bfloat16 is only supported on GPUs with compute capability of at least 8.0.
Your Tesla T4 GPU has compute capability 7.5. You can use float16 instead by explicitly
setting the`dtype` flag in CLI, for example: --dtype=half.
更改 --dtype 标志允许我们在 T4 上运行模型:
python -m vllm.entrypoints.openai.api_server --model=google/gemma-2b --dtype=half如果这是你第一次使用传递的 --model 启动 vLLM,则需要几分钟时间,因为它必须下载权重。由于权重存储在 ~/.cache 目录中,因此进一步的初始化将更快;但是,由于模型必须加载到内存中,因此仍然需要一些时间来加载(取决于模型大小)。
如果看到这样的消息:
INFO:     Started server process [428]
INFO:     Waiting for application startup.
INFO:     Application startup complete.
INFO:     Uvicorn running on http://0.0.0.0:80 (Press CTRL+C to quit)
vLLM 已准备好接受请求!
6、发出请求
服务器运行后,你可以发出请求;以下是使用 google/gemma-2b 和 Pythonrequest库的示例:
# remember to run: pip install requests
import requests
import json

# change for your host
VLLM_HOST = "https://autumn-snow-1380.ploomberapp.io"
url = f"{VLLM_HOST}/v1/completions"

headers = {"Content-Type": "application/json"}
data = {
    "model": "google/gemma-2b",
    "prompt": "JupySQL is",
    "max_tokens": 100,
    "temperature": 0
}

response = requests.post(url, headers=headers, data=json.dumps(data))

print(response.json()["choices"][0]["text"])
这是我收到的回复:
JupySQL is a Python library that allows you to create and run SQL queries in Jupyter notebooks. It is a powerful tool for data analysis and visualization, and can be used to explore and manipulate large datasets.

How does JupySQL work?

JupySQL works by connecting to a database server and executing SQL queries. It supports a wide range of databases, including MySQL, PostgreSQL, and SQLite.

Once you have connected to a database, you can create and run SQL queries in
准确!
7、使用 OpenAI 客户端
vLLM 公开了一个模仿 OpenAI 的 API;这意味着你可以使用 OpenAI 的 Python 包直接调用你的 vLLM 服务器。让我们看一个例子:
# NOTE: remember to run: pip install openai
from openai import OpenAI

# we haven't configured authentication, we pass a dummy value
openai_api_key = "EMPTY"
# modify this value to match your host, remember to add /v1 at the end
openai_api_base = "https://autumn-snow-1380.ploomberapp.io/v1"

client = OpenAI(
    api_key=openai_api_key,
    base_url=openai_api_base,
)
completion = client.completions.create(model="google/gemma-2b",
                                      prompt="JupySQL is",
                                      max_tokens=20)
print(completion.choices[0].text)
我得到了以下输出:
a powerful SQL editor and IDE. It integrates with Google Jupyter Notebook,
which allows users to create and
8、使用OpenAI聊天API
上一个示例使用了完成 API;但你可能更熟悉聊天 API。请注意,如果你使用聊天 API,则必须确保使用指令调整模型。 google/gemma-2b 未针对指令进行调整;让我们改用 google/gemma-2b-it,让我们启动 vLLM 服务器以使用此类模型:
python -m vllm.entrypoints.openai.api_server \
    --host 0.0.0.0 --port 80 \
    --model google/gemma-2b \
    --dtype=half
现在我们可以使用 client.chat.completions.create函数:
# NOTE: remember to run: pip install openai
from openai import OpenAI

openai_api_key = "EMPTY"
openai_api_base = "https://autumn-snow-1380.ploomberapp.io/v1"

client = OpenAI(
    api_key=openai_api_key,
    base_url=openai_api_base,
)

chat_response = client.chat.completions.create(
    model="google/gemma-2b-it",
    messages=[
        {"role": "user", "content": "Tell me in one sentence what Mexico is famous for"},
    ]
)
print(chat_response.choices[0].message.content)
输出:
Mexico is known for its rich culture, vibrant cities, stunning natural beauty,
and delicious cuisine.
看起来很准确!
如果你以前使用过 OpenAI 的 API,你可能还记得 messages 参数通常包含一些带有 {"role": "system", "content": ...} 的消息:
chat_response = client.chat.completions.create(
    model="google/gemma-2b-it",
    messages=[
        {"role": "system", "content": "You're a helful assistant."},
        {"role": "user", "content": "Tell me in one sentence what Mexico is famous for"},
    ]
但是有些模型不支持系统角色,例如 google/gemma-2b-it 返回以下内容:
BadRequestError: Error code: 400 - {'object': 'error', 'message': 'System role not
supported', 'type': 'BadRequestError', 'param': None, 'code': 400}
查看你的模型的文档以了解如何使用聊天 API。
9、安全设置
默认情况下,你的服务器不会进行任何身份验证。如果你计划将服务器暴露给互联网,请确保设置 API 密钥;你可以按如下方式生成一个:
export VLLM_API_KEY=$(python -c 'import secrets; print(secrets.token_urlsafe())')
# print the API key
echo $VLLM_API_KEY
并启动 vLLM:
python -m vllm.entrypoints.openai.api_server --model google/gemma-2b-it --dtype=half现在,我们的服务器将受到保护,所有没有 API 密钥的请求都将被拒绝。请注意,在上一个命令中,我们没有传递 --api-key,因为 vLLM 将自动读取 VLLM_API_KEY 环境变量。
通过使用任何先前的 Python 代码片段进行调用来测试你的服务器是否具有 API 密钥身份验证,你将看到以下错误:
No key: `AuthenticationError: Error code: 401 - {'error': 'Unauthorized'}`要解决此问题,请使用正确的 API 密钥初始化 OpenAI 客户端:
from openai import OpenAI

openai_api_key = "THE_ACTUAL_API_KEY"
openai_api_base = "https://autumn-snow-1380.ploomberapp.io/v1"

client = OpenAI(
    api_key=openai_api_key,
    base_url=openai_api_base,
)
另一个基本安全要求是通过 HTTPS 提供 API;但是,这需要额外的配置,例如获取 TLS 证书。
10、生产部署注意事项
以下是生产部署的一些注意事项:
- 部署 vLLM 时,必须确保 API 在崩溃时(或物理服务器重新启动时)重新启动。你可以使用 systemd 等工具执行此操作。
- 为了使你的部署更具可移植性,我们建议使用 docker。此外,请确保固定所有 Python 依赖项,以便升级不会破坏你的安装(例如,使用
pip freeze)。
11、使用 PyTorch 的 docker 镜像
我们建议使用 PyTorch 的官方 Docker 镜像,因为它已经安装了 torch 和 CUDA 驱动程序。
以下是可以使用的示例 Dockerfile:
FROM pytorch/pytorch:2.1.2-cuda12.1-cudnn8-devel

WORKDIR /srv
RUN pip install vllm==0.3.3 --no-cache-dir

# if the model you want to serve requires you to accept the license terms,
# you must pass a HF_TOKEN environment variable, also ensure to pass a VLLM_API_KEY
# environment variable to authenticate your API
ENTRYPOINT ["python", "-m", "vllm.entrypoints.openai.api_server", \
            "--host", "0.0.0.0", "--port", "80", \
            "--model", "google/gemma-2b-it", \
            # depending on your GPU, you might or might not need to pass --dtype
            "--dtype=half"]
12、关于 transformers==4.39.1的问题
tl;dr; 在官方 PyTorch docker 镜像中安装 vLLM 时,请确保使用具有正确 PyTorch 版本的镜像。为此,请检查相应的 pyproject.toml文件
在开发本指南时,我们在 transformers 包中遇到了一个错误。我们编写了一个使用 torch2.2.2(撰写本文时的最新版本)的 Dockerfile,然后安装了 vllm0.3.3:
FROM pytorch/pytorch:2.2.2-cuda12.1-cudnn8-devel
RUN pip install vllm==0.3.3
但是,在启动 vLLM 服务器时,我们遇到了以下错误:
File /opt/conda/lib/python3.10/site-packages/transformers/utils/generic.py:478
    475     return output_type(**dict(zip(context, values)))
    477 if version.parse(get_torch_version()) >= version.parse("2.2"):
--> 478     _torch_pytree.register_pytree_node(
    479         ModelOutput,
    480         _model_output_flatten,
    481         partial(_model_output_unflatten, output_type=ModelOutput),
    482         serialized_type_name=f"{ModelOutput.__module__}.{ModelOutput.__name__}",
    483     )
    484 else:
    485     _torch_pytree._register_pytree_node(
    486         ModelOutput,
    487         _model_output_flatten,
    488         partial(_model_output_unflatten, output_type=ModelOutput),
    489     )

AttributeError: module 'torch.utils._pytree' has no attribute 'register_pytree_node'
经过进一步调查,我们意识到问题出在 transformers 包中,具体来说,是在 _is_package_available 函数中。此函数确定当前的 torch 版本,该版本在代码库的几个部分中使用。尽管 vLLM 不使用 transformers 进行推理,但它似乎使用它来加载模型配置参数。问题在于 transformers 库使用的方法可能会返回错误的版本。
在我们的例子中,Docker 镜像中有 torch2.2.2,但由于 vllm0.3.3 需要 pyotrch2.1.2,因此运行 pip install vllm0.3.3 会将 PyTorch 降级到版本 2.1.2,然而,transformers 认为它仍然有 torch==2.2.2,导致执行崩溃。
这发生在 transformers==4.39.1 上,因此它可能会在未来的版本中得到修复。
联系我
最后,推荐大家关注一下开源项目:LangChat,Java生态下的AIGC大模型产品解决方案。
- LangChat产品官网:https://langchat.cn/
- Github: https://github.com/TyCoding/langchat
- Gitee: https://gitee.com/langchat/langchat